Posts Tagged ‘Home maintenance’

Save money, time and space by learning to separate the kitchen helpers from the hassles

Tuesday, February 11th, 2014

I’ll admit it: I have an expensive juicer that’s still in its box in my kitchen cabinet. It’s been there for months and cost close to $400. (We paid for it using wedding gift cards.) It’s our fourth one. But that’s because the other three (all the same model) failed within days. By the time we got a different brand and model, my wife and I had lost interest in the constant upkeep and chopping of an entire garden and orchard to get only one glass of juice for each of us.

Of course, I’ve suggested we return the juicer in exchange for something (or many somethings) that we’ll actually use, but my wife refuses to hear it. She plans to use it next week. She promises.

traditional kitchen by Sunbelt Lighting - Appliance and Design Center
In the same cabinet, we have a large Crock Pot that we never use, another juicer we bought at a garage sale (never use) and some electric chopper thing, also still in its box. If only I had thought about my actual cooking habits rather than give in to a fantasy about what my life might be like if only I had the right gadget, I would have saved a lot of space and money.

In a recent Houzz discussion about the worst home gadget, users pretty much echoed my dilemma. Popcorn makers, ice cream makers, waffle makers, rice makers (think before buying something with the word “maker” in it, by the way) — they all get used once and end up collecting dust in a cabinet.

So I decided to put together some questions we can all ask ourselves the next time we have the impulse to buy yet another bulky, complex, promises-to-make-my-life-easier home gadget. You might find that a good sharp knife and rearranging your busy schedule to allow just a little more prep time in the kitchen are all you need.

Can you use your hands? Cooking is a hands-on process, and that’s the way it should be. For most of us, it’s relaxing and therapeutic. There’s a subtle joy in chopping vegetables, measuring ingredients and working with your hands and simple tools. Once you take that out of the equation and surrender that control to a hulking, electric, ear-splitting gadget, you’ve relinquished the soul that goes into making good food.

And face it: You’re not ever likely to cook a meal for a hundred on a Friday night. That means you probably won’t get much use out of large appliances and gadgets meant to do a simple task at a high volume.

traditional kitchen by Elizabeth Beach Hacking, ShelfGenie Designer
Do you have space? If you’ve got the space — and money and need — to store every new gadget on the market, then by all means, have at it. But the majority of homeowners are very tight on space in the kitchen.

So before you buy, survey your cabinet space and take measurements. Where will the gadget or appliance go? If you have space only up high, how will you reach it? Will you need a step stool or ladder? And how heavy is the appliance? Do you have dishwasher space to accommodate the parts? A large enough sink to wash the machine in? The disruption this new gadget will cause in your life might just outweigh the perceived benefits.
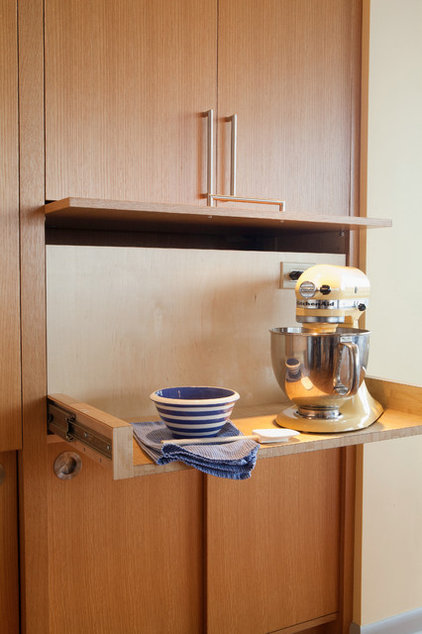
midcentury kitchen by ROM architecture studio
Do you have time? A big complaint with appliances is that they take a long time to clean. Most of them can’t go in the dishwasher, and even if some parts do, it takes time to disassemble the appliance, wipe it down and reassemble it.

Also, have you ever made your own pasta? It takes a long time. So maybe a pasta maker is not something you need on a regular basis.

transitional kitchen by kitchens by peter gill
What can you use it for? Avoid appliances or gadgets that offer to do one simple task just a little bit better: a garlic peeler, a lemon zester etc. Most of the time, you’ll find that a good kitchen knife will do the trick; plus it’s easier to clean and more empowering.

Also avoid gadgets that promise to do too many things. A multiuse gadget will likely do 10 tasks poorly, while 10 solid hand tools will perform great.

traditional kitchen by The Washington Kitchen Gallery
What will you use it for? If you made a pureed soup one time last year and thought maybe a handheld blender would make your life easier, maybe you should reconsider. Having a gadget that you take out only once or twice a year isn’t very efficient. Similarly, you probably don’t need a stand mixer if you bake only every so often.
transitional kitchen by Pennville Custom Cabinetry
Spend the money elsewhere. I can’t express strongly enough how important and useful a good set of kitchen knives is. One sharp knife can do the work of all those Slap Chops and multipart dicers. Plus, there will be less to clean up. And nothing beats a sturdy, handheld can opener.
contemporary kitchen by Susan Brook Interiors

Sleep on it. Never give in to a late-night infomercial or cooking demonstration on the spot. With any investment — no matter what the cost — give yourself time to really think about how important the gadget will be to you. Ask yourself the aforementioned questions first.

User 574steele has a great tip: “Before purchasing a gadget, check out the local thrift shops. If they have a zillion electric yogurt makers, they probably aren’t worth buying.”

And please, don’t give people gimmicky gadgets as gifts. If you don’t use one, chances are they won’t either.

Source: Houzz.com

Edmonton House Repairs And Upgrades: How Much Will They Cost?

Sunday, February 9th, 2014

home-repair-handyman-home-hero

During the process of buying or selling a home, your clients often learn about recommended or required repairs and upgrades. This can happen as a result of the home inspection as well as your expert knowledge of your market and comparable homes. Of course, the first thing homeowners want to know is, “How much will that cost?”

Pillar to Post is pleased to offer our Residential Construction and Remodeling Estimates cost guide, which provides estimated cost ranges for repair and/or replacement of the major systems and components in a home. It also includes general guidelines for the life expectancies of those systems. This information can help your clients make informed decisions when they’re considering home repairs or improvements, and is especially valued by homeowners before their property is listed. Below is just a sampling of our list of estimated costs for hundreds of repairs/upgrades.


Floors
Hardwood Floor Refinish $2-$5 / sq. ft
Carpet-clean $100 / room
Ceramic Tile $5-$10 / sq. ft

Kitchen
Renovation $7,500 +
Counter-laminate $40 / lin. ft
Kitchen counter-marble $75 / lin. ft

Security System
Alarm System $2,500
Alarm Monitoring $30 / month

Deck
Pressure Treated $15-$25 /sq. ft
Custom Designed & Built $50-$75 / sq. ft.

Windows
Skylight $750 and up
Thermal Glass (existing frame) $30 / sq. ft.


These estimates reflect the average basic costs for supplies and installation of building materials in United States and Canada. Costs may vary depending on regions, upgrades, complexity, and disposal fees.

Source: Pillar to Post Newsletter

Watch for these electrical hazards in your home

Friday, February 7th, 2014

·ºÅØ

Electricity in the home is so commonplace that it’s easy to forget how dangerous it can be. According to the American Institute for Preventive Medicine, an electrical shock can knock you unconscious, cause a serious burn, or even stop your heartbeat.

Fortunately, there are some simple things you can do to reduce the risk.

  • Install safety plugs in outlets that young children can reach.
  • Never plug in anything with a frayed or otherwise damaged power cord.
  • Never use a plugged-in computer, hair dryer, or other electrically-powered item near a filled sink or bathtub. This includes phones with power cords.
  • Never touch anything electrical with wet hands or while standing in water. (Water is a remarkably efficient conductor of electricity.)
  • Always turn off the appropriate breaker before doing any electrical work, such as installing a new light fixture.
  • When replacing a broken light bulb, turn off the breaker first. Although the glass is broken, the filament may still be conducting electricity.

Finally, unless you’re an expert or an electrician, never do any major electrical work on your own. Hire a professional.

11 Ways to Update Your Kitchen Without a Sledgehammer

Monday, February 3rd, 2014

Screen Shot 2014-02-03 at 12.43.28 AM

OK, so you have a perfectly good kitchen. The layout works; the cabinetry is solid; but it just needs a little uplift. There are plenty of relatively minor changes you can make that don’t involve restructuring your life and house. Here are a few.

1. Repaint your cabinets. A fresh coat of paint can transform a kitchen from dark and dingy to light and airy. If you are a few years away from that big kitchen reno, this is a great time to have some fun with color.

2. Upgrade your countertop. Upgrading a dated countertop will give new life to your entire kitchen and add value.

3. Install a new backsplash. If your cabinetry and countertop work nicely but your room lacks pizzazz, a new backsplash can add lots of personality and really dress up a kitchen. A bit of texture, sparkle or gloss will give simple cabinetry a lot of presence.

4. Make a statement. New jewelry always picks up my mood. It can do wonders for your kitchen too. New hardware can dress up plain cabinets, while standout lighting fixtures can add a surprising wow factor.

5. Change your faucet. A detachable hose with a hand spray comes in handy for so much more than just giving a bath to the cat. I prefer a faucet with a flexible braided water-supply hose. It looks better than a plain black rubber hose and will last longer.

6. Expand your horizons. Need more surface area? Don’t think you need to start from scratch. If you have an island, you can introduce a different material on an added eating counter either below or above the counter.

The standard counter height is 36 inches. A nice option, like you see here, is to add an extension at table height (30 inches is typical). The great thing about adding a table-height extension is that regular kitchen and dining chairs will pull up to the counter comfortably. If you prefer a higher surface, you could go with bar height (40 to 42 inches).

7. Consider refacing. New cabinet fronts and doors can dress up the cabinetry boxes if the layout already works and they are solid.

8. Rethink the uppers. Open shelving offers an opportunity to display collections or just keep frequently used items accessible. Wine comes to mind, but that’s just me.

9. Add some cozy touches. A runner is a great addition to a galley kitchen. I don’t know why we are disciplined to treat our kitchen like it has a different set of rules when it comes to decor. I’m all for adding a table lamp for an unexpected element in a kitchen.

10. Add a floating island. If a new bank of cabinetry is beyond the budget, try a ready-made freestanding piece to add extra storage and a surface for working and eating surface.

Add a new top to a freestanding piece of furniture and extend the edge for an eating counter. The minimum overhang would be 10 to 12 inches, but there are a few considerations when extending the top. Take care not to shift the balance of weight so much that the piece is unstable (people love to rest their elbows, adding weight to the surface). Also you may need to add brackets to support the overhang.

11. Add a showstopper. A simple kitchen with simple cabinetry is downplayed by a showpiece range. Playing up one feature is a great way to detract from less interesting elements.

Source: Houzz.com

Home Maintenance Feature: Changing the HVAC Filter

Tuesday, January 14th, 2014

HVAC_maintenance

Changing the filter of the home’s HVAC system is simple and inexpensive, and taking care of it at least every three months can mean the difference between optimum comfort and avoidable repairs.

Your HVAC technician should service your unit once a year.  Because a HVAC unit contains moving parts, it is important that belts are not cracked and dry, ventilation ductwork is not gapped, cracked or rusted, and components, such as coils and fans, are clog-free and adequately lubricated for unimpeded operation.  This sort of evaluation is best left to the professional, unless the homeowner has had the appropriate training. The filter of the unit, especially if it is an HVAC unit that will tend to get nearly year-round use, should be changed by the homeowner at least every three months, but possibly more often. Check your filter’s condition and change it once a month if:

You run your unit six months a year to year-round.

You have pets. Pet dander can become airborne and circulate through the home’s ventilation system just as typical household dust does.

You have a large family. More activity means more household dust, dirt and debris.

You or someone in your household suffers from allergies or a respiratory condition.

You live in a particularly windy area or experience high winds for extended periods, especially if there are no nearby shrubs or trees to provide a natural windbreak.

You live in an area prone to or having recently experienced any wildfires. Airborne ash outdoors will eventually find its way indoors.

You have a fireplace that you occasionally use.

You live on a working farm or ranch. Dust and dirt that gets kicked up by outdoor work activity and/or large animals can be pulled into the home’s ventilation system, especially through open windows.

You have a large garden. Depending on its size and how often you work it, tilling soil, planting, pulling weeds, using herbicides and pesticides, and even watering mean that dirt, chemicals and condensation can be pulled into your home’s ventilation system.

There is construction taking place around or near the home. You may be installing a new roof or a pool, or perhaps a neighbor is building a home or addition. Even if the activity is only temporary, dust and debris from worksites adjacent to or near the home can be sucked into the home’s ventilation system, and this increased activity can tax your HVAC system.
Tips for changing the filter:

Turn off the unit before replacing the filter.

Use the right filter for your unit and make sure it’s not damaged out of the package.

Follow the directions for your unit to make sure you’re installing the filter properly. For example, many filters use different colors for the front and back (or upstream and downstream flow) so that they’re not installed backwards.

Make sure there aren’t any gaps around the filter frame.  If this is the case, you may have the wrong size filter, or the filter itself may be defective or damaged.

Use a rag to clean up any residual dust before and after you replace the filter.

Securely replace any levers, gaskets and/or seals.

Turn the unit on and observe it while it’s operating to make sure the filter stays in place.

Note the date of filter replacement in a convenient location for the next time you inspect it.  A filter that becomes dirty enough to change within a short period may indicate a problem with the unit or ventilation system, so monitoring how often the filter requires changing is important information for your technician to have.

Source: Full Scope Inspections Newsletter

Sustainable Housing: Lungs For Your Home

Friday, January 10th, 2014

A hand held thermographic camera used to test the efficiency of insulation in a house.

Stale air, lingering odours and high humidity can happen in the best of homes and, sometimes, simply opening a window can bring relief. When it’s mild outside and there’s a breeze, opening a window can be beneficial. But in Canada’s hot and cold climate, this is not always practical or possible.

Leaving a window open in mid-winter will add to your space heating costs, cause uncomfortable drafts and the window may freeze open. You also can’t filter the dust out of the air nor can you recover any of the heat that flows out an open window. Sometimes leaving a window open is a security or noise concern. Finally, you can’t control how much air enters through an open window or where it goes once it’s in your house.

Heat Recovery Ventilation

Fortunately, there is another way of bringing fresh air into your home that is energy efficient, secure and highly effective – a heat recovery ventilator (HRV). HRVs are suitcase-sized appliances that typically have one fan to bring in outdoor air and another fan to push out the stale air. Heat is transferred from the outgoing air to the incoming air by passing the two air streams through a heat-exchange core, helping to reduce heating costs. As the two air streams are kept separated, only the heat is transferred to the incoming air. In a sense, an HRV can act as the lungs for your home.

In houses with baseboard or radiant heating, the fresh air from the HRV is delivered directly to the bedrooms and the main living areas through a dedicated duct system. At the same time, the HRV draws stale air from the kitchen and bathrooms and sends it outside.

In houses with furnaces, it’s not uncommon to find HRVs connected to the furnace ductwork system. The furnace then operates continuously to circulate the fresh air around the house, while bathroom fans and kitchen range hoods provide back-up ventilation as needed. HRVs have multi-

speed settings to deal with varying ventilation needs. Automatic controls are available as well to modulate the operation of the HRV as needed.

HRVs are built into energy efficient new houses to reduce air leaks, and heating and cooling costs, and keep your home more comfortable. Cutting down on uncontrolled air leakage also helps protect your roof, walls and basement from moisture damage. The better sealed a house is, however, the more it needs controlled, energy efficient, mechanical ventilation to provide the indoor-outdoor air exchange required to maintain healthy indoor air quality. By eliminating random air leaks in existing houses and adding heat recovery ventilation, you reduce your heating bills while maintaining as good, or better, indoor air quality.

Installation

Although you can buy an HRV at some home improvement stores, it may be preferable to have it designed and installed by a qualified contractor certified by the Heating, Refrigeration, Air Conditioning Institute of Canada or other training organizations in accordance with current building codes and standards. It’s very important to measure and balance the supply and exhaust airflows to ensure the HRV does not potentially create dangerous house depressurization or pressurization problems. This should be carried out when the HRV is first installed and should be checked regularly afterwards by a qualified contractor in accordance with the manufacturer’s instructions. Look for units with lower energy usage and high energy efficiency in the heating season, preferably choosing from those with an ENERGY STAR® rating.


Source: Dominion Lending Centres Newsletter

Humidity, Home Health and Comfort

Tuesday, January 7th, 2014

Screen Shot 2014-01-07 at 1.40.53 PM

Homeowners concerned about the quality of the air they’re breathing, as well as the cost of heating, would do well to have a close look at their home’s humidity levels. In the winter, in addition to causing dry conditions and breathing discomforts, lower humidity levels can increase the need for additional heating to make us feel warm. We feel colder when artificially heated air is too dry and removes moisture from our bodies, just as in the summer we feel warmer when there is too much humidity in the air. So watch your humidity this winter: low levels can cause itchy, flaky skin, dry sinuses, cracked wood furniture, static electricity and a higher heating bill. To make your home more comfortable and less costly to heat, consider installing a humidifier, set at approximately 50%, and adjust it as required throughout the cold season.

How to Create a Built-In Home Bar

Monday, January 6th, 2014

Screen Shot 2014-01-06 at 10.24.52 AM

You may have just finished draining your champagne glass on New Year’s Eve, but it’s not too soon to resolve to make your next home gathering more stylish, more sophisticated and easier by adding a home bar in 2014. Here’s what to know if you’d like to get it done.

Save Photo

Project: Building a home bar into a nook or wall.

Why: “Home bars create a special place to store and serve drinks closer to the living space,” says New York architect James Wagman. “If the bar is near the action, the host can create wonderful drinks while socializing with guests and family.”

Built-in bars don’t need to be limited to homes blessed with abundant square footage. A built-in bar can be the width of a single cabinet. Wagman installed this diminutive but mighty bar at the entrance to an apartment’s living room. Pocket doors come out of the wall to hide the unit when it’s not in use.

Who to hire: More bells and whistles require more pros. A well-stocked bar, such as this crisp blue entertaining space by South Park Design Build in Toronto, would require an architect or interior designer to design the space and a contractor to build it. The building crew might include a carpenter to construct custom cabinetry, a plumber for a sink and an ice maker, an electrician to add outlets for a refrigerator and other appliances, a tile setter to install a backsplash and a painter to provide the finishing touches after the hammering is done.
Project length: Most professionals interviewed for this article — including the creator of this bar, San Francisco interior designer Tineke Triggs of Artistic Designs for Living — say you should allow a little more than a month to add a built-in bar. However, David Miller of David Michael Miller and Associates in Scottsdale, Arizona, cautions that the more customized the project is, the longer it will take. “There’s a wide range,” he says, “but if you are building it from scratch, it may take six to eight months due to custom millwork.”

Cost: As with every home improvement project, the cost will depend on the scope of your project, your choice of materials and finishes, and the price of labor where you live. Luly Melarti, a designer and architect at TerraCotta Properties in Decatur, Georgia, estimates that adding a bar similar to this one she did for entertaining-loving clients could cost around $9,200 — and that’s if there’s an existing niche where it could be placed and walls don’t need to be moved. She breaks it down this way:

    • Design fees and labor: $4,000
    • Cabinets: $3,000
    • Refrigerator: $1,200
    • Countertop: $600
    • Mirror backsplash: $400

“Obviously, there’s a wide range in costs, depending on how much work needs to be done,” she says. “If you don’t move walls and you don’t add plumbing, you are going to save money.”

Melarti notes that this client opted for no sink and installed a tough Corian countertop. “If you choose a more expensive stone, you will need to babysit it. With this material you don’t need to worry about etching from wine, lemons or limes,” she says.

San Francisco interior designer Anastasia Faiella created this bar for coffee and stronger drinks with her architect husband Andre Rothblatt, and says a similar feature could cost between $13,000 and $15,000, not including design fees. “This example is a very high-end, customized project, and the homeowner wanted things to be extra special,” she says. “The design included a wine refrigerator and an espresso maker that needed plumbing.” She estimates costs this way:

  • Custom cabinets (materials, labor, installation): $5,000
  • Labor for appliance installation: $3,000
  • Miele coffee system: $2,999
  • ULine Echelon series wine refrigerator: $2,899
  • Countertop (wood with a decorative finish): $1,000

Permit needed: If you are adding plumbing or electricity or moving walls, you will need a permit.

Best time of year to do it: Eric Adelman of South Park Design Build says building a bar is a seasonless project. “Anytime is the right time for this project,” he says. “Especially if you are thirsty!”

Architect Nico van der Meulen in Randburg, South Africa, says if you are staging a major remodel or building a new home, plan for a bar early in the process. “Begin right at the start of the planning and building to ensure there is ample space for it,” he says.

First step: Miller suggests doing your homework. “To start the brainstorming process, look at sites like Houzz or design magazines to see what other people, designers and architects are doing,” he says.

Jason Urrutia of Urrutia Design in Sausalito, California, suggests starting small with a bar cart or tray. “You can move it around and see where it works best before investing thousands of dollars,” he says.

Once you’ve decided to make it more permanent, “if you want a professional look, hire a professional,” Miller advises.


Source: Houzz.com

Keep Your Refrigerator/Freezer In Good Working Order

Friday, January 3rd, 2014

fullfridge_440x300

The latest refrigerator/freezers are great at saving energy and offering convenience, but many new features require sophisticated programming and circuitry that simply isn’t built to last as long as the energy hogs of previous generations. To help you extend serviceability over time, be mindful of a few small maintenance recommendations.

Two of the most important ways to keep your fridge/freezer running efficiently is to ensure all door seals are intact, and to keep the condenser coils free of dust, debris and clutter. The fragile coils are usually situated above, below or behind the unit, often protected by a screen or grill, to provide undisrupted access to cooler air. They should be carefully (gently) dusted at least once a year. The third maintenance step is to

make sure any water or ice dispensers are clear and free-flowing.

Your Next Big Project: Seven Steps To Help You Prepare For A Major Renovation

Thursday, January 2nd, 2014

Screen Shot 2014-01-02 at 1.02.37 PM

1)  Identify the changes or additions you need for function, then add a wish list inspired by magazine articles or web resources. Don’t factor in cost at this stage.

2)  Consider how your project might affect other parts of the home (e.g. energy-efficient windows won’t be very effective if adjoining rooms are leaking air).

3)  Before planning changes in structure (e.g. walls) or utility locations (e.g. HVAC, plumbing and/or electrical), engage the advice of a trusted professional.

4)  Interview prospective contractors and their references. Choose the one most suitable, based on ideas, itemized costing, communication skills, realistic timelines, relevant experience and references.

5) Define a clear, realistic and affordable budget, leaving about ten per cent for contingencies.

6) Insist on liability insurance, licensed trade work, industry standards and inspections, material warranties and guarantees (as applicable), as well as a contract with reasonable timelines for consultation, design, permits, material acquisition and completion deadlines – with applicable penalties if breached unreasonably.

7) Be flexible, but avoid changing plans mid-project, if possible.

The data included on this website is deemed to be reliable, but is not guaranteed to be accurate by the REALTORS® Association of Edmonton. The trademarks REALTOR®, REALTORS® and the REALTOR® logo are controlled by The Canadian Real Estate Association (CREA) and identify real estate professionals who are members of CREA. Used under license.